![]() This section is valid for all product flavors.
This section is valid for all product flavors.
Registered and logged in users can save their own map compositions and workspaces. Workspaces and maps are stored in a user profile and are immediately available after user log on, but they also can be saved to a file. The user profile data is stored on the server where Geospatial Portal is installed and instantiated. A map is a single composition of several layers that may come from different data sources; a workspace can be understood as a container for several maps. The User Maps feature is used to save maps and workspaces within a configuration.
To add a Workspace or Map:
You can add maps and workspaces as follows:
To add a map or workspace from a map window: From the User maps dialog box, Maps/Workspaces menu, select Add > From map. This method lets you save the state of all displayed layers and the extents for all map variants.
Save credentials of connected data sources option - If enabled, saves all credentials for authorized services used in a created map or workspace. If the option Save credentials of connected data sources was enabled while creating the workspace or map, Portal will try to load and initialize all services with the credentials saved and used earlier. If the provided credentials fail, an attempt to initialize services as an anonymous user will be made.
![]() When another map is added to the existing workspace with the Save credentials of connected data sources option, the credentials will be saved for the whole workspace (even if previous maps have been added to the workspace without credentials).
When another map is added to the existing workspace with the Save credentials of connected data sources option, the credentials will be saved for the whole workspace (even if previous maps have been added to the workspace without credentials).
To add from an earlier exported file: From the User maps dialog box, Maps/Workspaces menu, select Add > From gpm/gpw file.
A map file has the .gpm extension, and a workspace has the .gpw extension.
![]() The Add command is not available in the context menu for single maps within a created workspace or for single maps in the Maps group.
The Add command is not available in the context menu for single maps within a created workspace or for single maps in the Maps group.
Maps and workspaces have a menu with the following functions and commands:
![]() When displaying the workspace, the default (first) map will be shown in the map window and Map Content, but the map selector (drop-down list or buttons depending on the Geospatial Portal configuration) will be populated with all maps from a given workspace.
When displaying the workspace, the default (first) map will be shown in the map window and Map Content, but the map selector (drop-down list or buttons depending on the Geospatial Portal configuration) will be populated with all maps from a given workspace.
![]() Always make your workspace or map public if you intend to use them in the starting configuration.
Always make your workspace or map public if you intend to use them in the starting configuration.
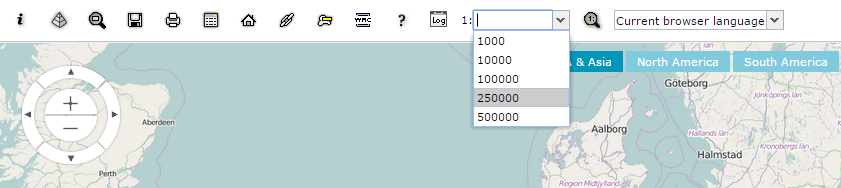
To add predefined scales, select Properties for the map. On the Predefined scales tab, click Add and type a scale denominator. Click Save. Next display the map (by selecting the Display command). A drop-down list with predefined scale options is provided.
![]() For a workspace, the Properties command allows you to add/remove the Coordinate Reference System and to define such parameters as axes direction and whether the given CRS is geographic or not.
For a workspace, the Properties command allows you to add/remove the Coordinate Reference System and to define such parameters as axes direction and whether the given CRS is geographic or not.
The CRS list in the Coordinate reference system tab corresponds to the coordinate system list on the Settings tab. You can add a CRS or remove a CRS from the Coordinate reference system list by using the Add and Remove buttons. The Add button opens a Spatial Reference System where you can find and add coordinate systems to the list. See Changing the Coordinate System for more information.
Once the CRS is added for the workspace, the appropriate entries (CRS) appear in the properties for all child maps for the given workspace in the Map ranges tab. Displaying the workspace using the Display command automatically adds the CRS, defined for this workspace, to the Coordinate System list visible on the Settings tab in the Sidebar.
![]() Passwords stored in GPW and GPM files are secured with the AES Rijndael algorithm. The backward compatibility is maintained, and the use of older GPW files containing unencrypted passwords is also allowed.
Passwords stored in GPW and GPM files are secured with the AES Rijndael algorithm. The backward compatibility is maintained, and the use of older GPW files containing unencrypted passwords is also allowed.
![]() It is possible to save (and load) selection in user maps and workspaces. Loading the user map with stored selection (or workspace with such a map) sets selection on those features. In order to save selection, the value of
It is possible to save (and load) selection in user maps and workspaces. Loading the user map with stored selection (or workspace with such a map) sets selection on those features. In order to save selection, the value of saveSelection parameter in Portal’s Web.config must be set to true. See Save Selections in User Maps topic in Geospatial Portal Administrator Guide or contact with your Geospatial Portal administrator for more details.